

On-Page SEO WorkSheet
When I started doing On-Page SEO, I sometimes forget important things at the beginning — like adding alt text to images, keeping my heading structure correct, writing a proper meta description or adding meta title, and many other small steps that important to Web Page to rank on google.
This is a problem many of us face when we are just starting our SEO career or are completely new to SEO, including business owners want’s to improve their website by themselves.
To help solve this problem, I designed this On-Page SEO Worksheet. That You can use it while working on your webpage or client website to keep track of the important On-Page SEO elements and avoid forgetting the basics.
Learn it, apply it, and use the worksheet to check your work.

How This Worksheet Helps You?
1. It will help you understand the important steps of On-Page SEO.
2. It will help you keep your SEO work organized.
3. You can find areas on your webpage that need improvement.
4. You can follow this process on any webpage of your website.
How to Apply This Worksheet on Your Webpage?
Click to download the Worksheet

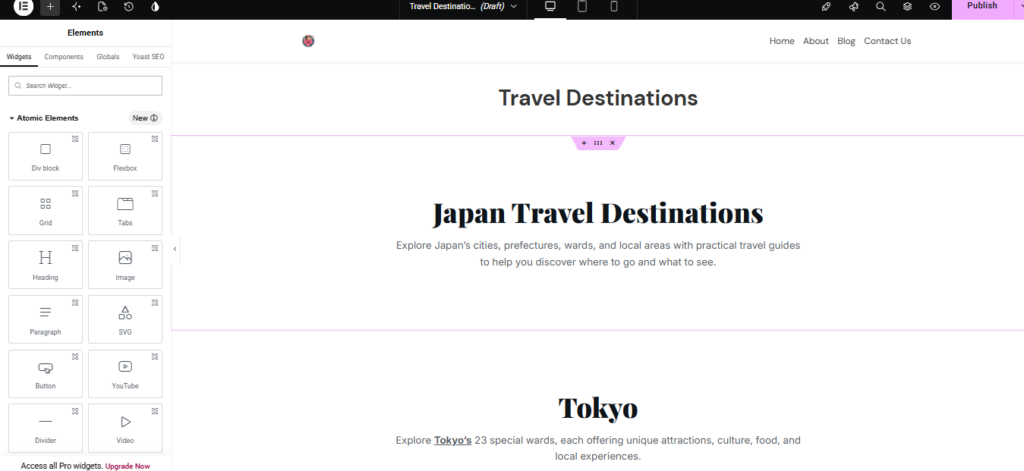
Step 1 — Choose a Webpage
Pick one webpage from your website or client website that you feel needs improvement.
To make you understand the steps, I will show you practically on my second website, japantravelblog.online. There is a page on my website called Travel Destinations. That need improvement. I think this is best for to make you understand the steps. I want to tell you I use Elementor to design my website pages. If you use any other website designer, it is okay.It doesn’t affect the worksheet flow.
I use Elementor because it makes website design easier for me.
This is not sponsored; I am just sharing my personal opinion why i choose Elementor.
Let’s move forward to Step 2
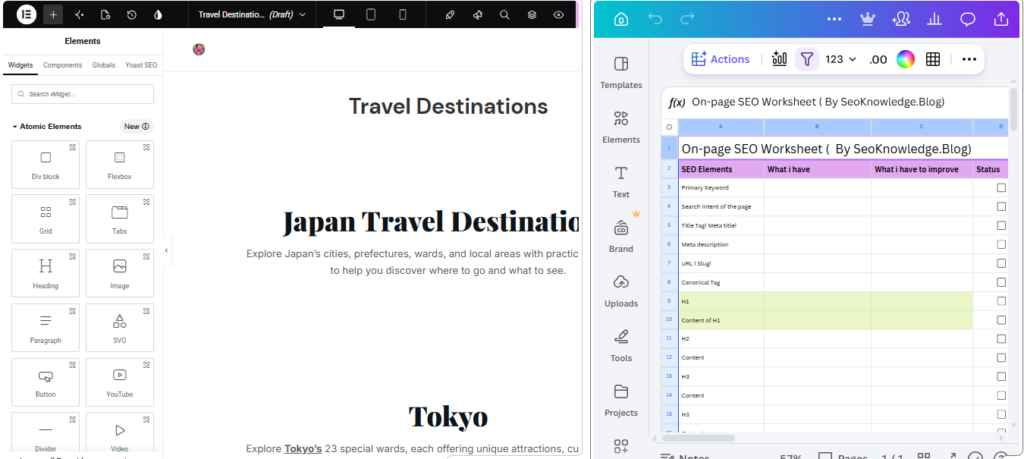
Step 2 — Open the Worksheet
Hope you have downloaded the worksheet.
A tip: Open the worksheet in your browser.
It will be easier for you to follow the steps because you can split the screen and keep your
webpage on one side and the worksheet on the other side.
I created this worksheet in
Canva,
so you can also edit it according to your webpage.

Step 3 — Check Each SEO Element
Now this is an important thing to keep in mind.
You are human, not a robot.
At a time, you can focus on one thing. In SEO,
patience is the key — something I learned from my own mistakes.
I am telling you this from my own experience, not just to tell your clients.
Go through every SEO element step by step.
At each step, make the changes in one element and then move to the second one.
Don’t take the worry of how many steps are left.
For example, if you are working on your heading structure,
just work on it. Stop worrying about the meta title
and meta description until you reach there.
Do it slowly, one step at a time.
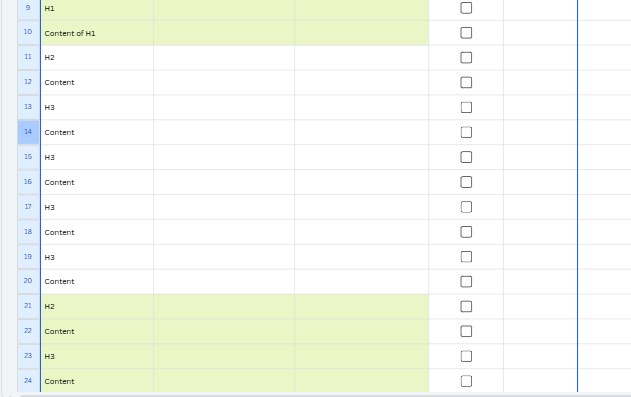
Let Me Explain the Worksheet
Let me explain a little about the worksheet.
It will be easy for you to work with.
I have included 1 H1 heading as the main heading of the webpage.
Then I have added 10 H2 headings and 4 H3 headings,
along with paragraph boxes in the worksheet.
You can copy the existing content from your webpage
into the worksheet before making changes.
This will help you compare what you already have with what you want to improve.
Now a sudden question may come into your head:
“Aman, why did you add 10 H2 headings?”
So, I know many websites have 5 H2s, 7 H2s, 10 H2s, or even more.
It totally depends upon the content of your webpage.
You don’t have to use all 10 H2 sections.
You can easily edit the worksheet in Canva
according to your webpage. I created this worksheet in Canva so you can make the changes you need.
Again, this is not sponsored.
I am just sharing the tool I used to create the worksheet.
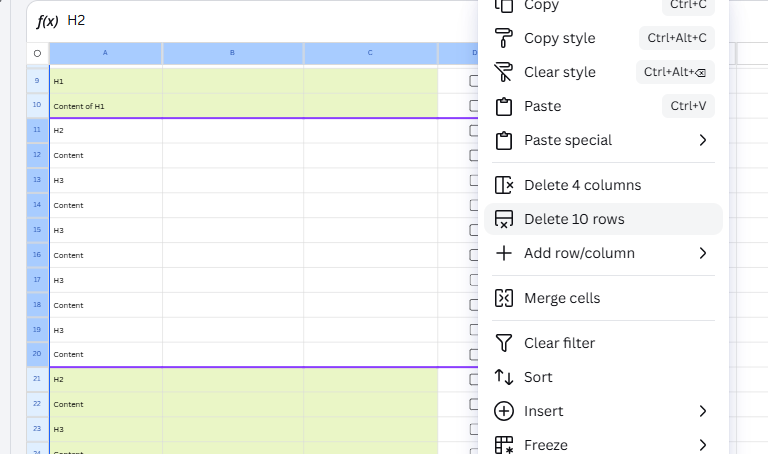
How to Delete Extra Headings
You might have 5 H2 headings on your webpage, but the worksheet has 10 H2 rows. So what should you do with the extra ones?
I will show you the method in the image below.
Simply select the rows you want to delete, then right-click. You will get an option called Delete rows. Just click it, and those rows will be deleted.
You might think: “Aman, you give us extra work to delete the rows!” 😄
To solve that, you don’t have to delete them first. You can fill in the required sections and delete the extra rows afterward.
How to Add More Image Sections
I have also added 5 image sections to the worksheet.
Each image section has boxes for File Name, Alt Text, Caption, Description, and Title.
How many images you need completely depends upon your webpage. You can add more images to the worksheet if you need them.
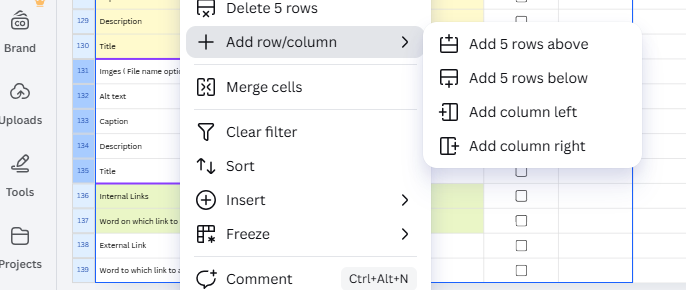
To add more, select the last 5 image sections with all the boxes — File Name, Alt Text, Caption, Description, and Title. Then right-click.
You will get an option called Add row/column. Just click it, and then click Add 5 rows below.
After that, 5 new image sections will be added below your existing image sections.
You can use the same method whenever you need more image sections for your webpage.
You Can Do the Same With Links
You can follow the same process for internal links and external links.
If you need more rows for your links, simply select the existing link sections, right-click, and choose Add row/column. Then click Add rows below and continue adding the links you need.
You can use this method whenever your webpage needs more internal or external links than the worksheet currently provides.

Step 4 — Write It Down First
Take a pen and notebook. Still, if you are not a big fan of either of them, that’s okay. 😄
In the notebook, first write the improvement version of your webpage content. Then you can add those changes to your SEO worksheet.
I know you might think, “Aman, we already have the worksheet online, so why should we go through the hard process of writing in a notebook and then typing it into the worksheet?”
Actually, there is a good reason behind it. Recently, I read a blog about how writing by hand can boost creativity. I also feel that when you write your blog or webpage content in a notebook, you get more freedom to think, change your ideas, and write whatever comes to your mind.
You can read the blog about writing by hand and creativity to understand more about it.
For me, the idea is simple: think first, write it down, improve it, and then apply it to your webpage.

Step 5 — Make the Changes
I hope you have written some great content for your webpage. If you are doing this for the first time, it might feel overwhelming, and you may not be able to finish the entire webpage in one day.
There is a common myth among new SEO learners that we should be able to write and optimize a complete webpage in just one day. But honestly, it doesn’t always work that way.
When you are just starting, you may not have enough experience or the right tools to make all the changes quickly. So, if it takes you 1–2 days to complete your webpage and you feel a little demotivated, that’s completely normal.
Don’t put too much pressure on yourself. You are learning something new, and it takes time to get comfortable with the process. I believe you can do it.
Now, it’s time to take the improvements you have written down and implement those changes on your website.

Step 6 — Review the Changes
When we are in exams, we usually recheck our answer sheet before submitting it to make sure we haven’t missed anything or made any mistakes.
The same thing applies to SEO. Before you submit your webpage to Google, take some time to review your webpage content and the changes you have made. Go through everything once again and check if anything needs to be corrected or improved.
Also, don’t forget to check your SEO worksheet. Go through each section and make sure you haven’t missed any important SEO element.
I know after completing five steps in a row, you might feel tired when you see one more step. But trust me, this final review is worth it. I promise. 😄
Take a little time, review your work, fix anything you find, and then your webpage is ready for the next step.